Wednesday 1 August 2018

Guest post - A Sky Painted Gold nail art

I'm thrilled to feature a guest post from Demet at 'Books polished' about her amazing nail art designs inspired by book covers. Today, Demet will take us through how she created stunning nail art based on the cover for A Sky Painted Gold, one of my favourite books. Thank you so much Demet for sharing your nail art secrets!

This is my workplace. It's a mess, but it's mine.
I usually have either an audiobook running or, as in this case, a Netflix show.
If you are wondering what I'm watching here, it's the second season of "Anne with an E" and spoiler: it is gooood!

1. I always start with blank nails and a coat of base coat.
If you want your nail polish to last, this stop is vital.
And before you ask: Yes, these are my natural nails. Yes, they are a bit yellow because I paint them so often. No, they do not hinder me in any daily activity.


2. Next step is putting down the base colour.
People always tell me that they "can't even paint [their nails] in one colour" and
this picture is to show you: I can't either.

3. But since I know how to clean them up, I don't even care.
Tip: a flat brush (like an angled eyeliner brush) and nail polish remover can go a
long way! If you don't have a brush, a Q-tip also works well.

4. In a lot of cases, I paint the base colour, top coat it and come back another day
to finish the design. This is because I generally work very slow and I'm trying to
not stay up too late, 'just' to paint my nails. But also because some of the base colours require several coats of polish and this way get a better chance to dry.
In this case, I also broke the nail on my pointer finger and had to file it down and re-paint... Screw you big Elvis book which I was trying to get off the shelf!

5. Most of the design for this mani consists of dots.

6. Dots over dots over dots.

7. Things like this can get quite messy, so I like to go in with the base
colour again and clear the design up a bit.

8. Next to a base coat, the other vital thing to make a manicure last? Top Coat!
And I always say, especially with a more complicated mani: top coat as you go!
So when you are done with the design of one nail: top coat it. It seals the design in and makes it dry faster, which reduces the chance of you smudging it. And trust me, the last thing you want to do, after spending a lot of time on a mani, is smudge it...


9. Next up is the figure of a girl standing in the water.
As this is the most complex part of this mani, I wanted to get her out of the way.
First: I did a rough sketch of the figure in gold.


10. Then I painted in the top of her dress again in dark blue, to give her a sharper outline.
  
11. Next, I went back to the hair, switching between blue and gold, trying to get the shading right and to give the hair more volume.

12. The last step was to set her outline, by putting in the dots symbolising the
water around her body.
13. Top Coat. And another nail done.


14. Now that she is out of the way, we are going back to painting dots.

15. And even more dots.


16. Basically, aaaall the dots. Even in different sizes!

17. In between and at the end, I switch between the gold and the dark blue to clean the design up a bit. To make some dots more round and to let others who ended up in the wrong spot, vanish completely.

18. At some point during this, the changes are so small, that probably
no one will appreciate them except for me.
But Hey! I'm the one who sees them all the time, so that is just fair.
Even though I have to say, there is a point where you have to stop yourself from
doing more and more changes and just call it a night.
But that's the case for so many things in life.


19. In case you are wondering what I do with slightly dried nail polish on my brush:
I clear most of it off pretty quick with my fingers and if I change colours, I will
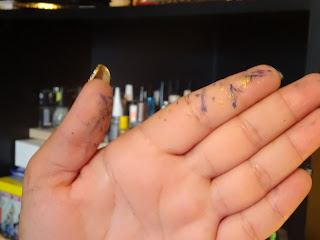
then also clean the brush with Acetone. This is how my fingers look, after something like this. Even though I have to say, I cleaned them in between, so this is not all.
Note: If you do use Acetone to clean your skin, please remember to put lotion on them after or even nail oil.It dries your skin really badly!


20. All the utensils I used for this design!
That is: 100% Acetone, a stamper that I use as a pallet (because it's cheap and easy to clean), gold and dark blue nail polish, quick dry top coat, base coat and nail polish remover pads to clean the stamper. And in the front, you can see my clean-up brush with my detail brush behind it.


I'm fascinated by the amount of effort and skill that goes into this process! Thanks again for sharing, Demet. Check out Demet's Instagram here for the stunning finished product. You can also find Demet on Twitter @books_polished.

No comments:

Post a Comment